When wanting to prevent punctures, you have a couple options: upgrade to a thicker tire and/or tube, upgrade to a tire with Kevlar, install a puncture guard or add sealant to your tubes.
I’ve seen most people use slime to prevent or seal punctures. Self-sealing tubes are readily available at any Walmart and many online bike part retailers. There are also bottles of sealant (specifically, “Slime” brand sealant) you can add yourself to your existing tubes.
Back in February I purchased the Michelin “Protek Max” tubes and put them through their paces. The Protek Max is a tube that contains Michelin’s own version of “Slime” (“Slime” is a generic trademark for a tire puncture sealant) and a special design on the tube to prevent punctures from happening in the first place. I was very hard on the tubes when testing them.
Both tubes failed… the first failed in early April. The other tube, which was installed in the rear tire, just failed a couple days ago. When I started riding my bike a couple weeks ago, the second tube was holding air just fine despite having some previous punctures (see my “Bike Check” entry.) Unfortunately, about a week after posting that entry I walked outside just to find the rear tire was completely flat. After reinflating the tire, the tube started to leak. I could never get it to hold air very long (about a couple hours,) despite trying many things. It was the end of the second Protek Max.
Michelin’s Protek Max is far from the only option in terms of self-sealing tubes. Walmart typically carries two varieties… a “Slime” branded tube (generic CST/Bell tube with slime pre-installed) and a “Bell” brand tube with a different type of sealant inside. There are tons of other options online.
But the other option is buying a bottle of the Slime sealant and adding it yourself. It’s fairly easy to do, although at that point it may be cheaper to buy “pre-filled” tubes if you are determined to go with self-sealing tubes and are buying new tubes.
That’s exactly what I did. I bought a bottle of Slime sealant to test out with the Goodyear heavy duty tubes installed on the Sedona. One bottle of Slime will treat both tires.
Installation

The bottle of sealant comes with a fill tube to get the slime into the (inner) tube, and a valve core removal tool. To install Slime, the tube must have a removable valve core.
First, I would recommend installing the slime outside, in a garage or in a location where a mess can easily be cleaned up. The slime will easily stain any piece of clothing, carpeting or anything else it comes into contact with. You will likely want a paper towel or shop towel with you to clean up any mess that may occur.
After finding a good spot, deflate the tube (if needed) and remove the valve core. Make sure to keep the valve core in a safe location so it isn’t lost.
The actual process of getting the slime into the tube isn’t that difficult, but you have to have the tube with the valve in the upper-half of the rim (between the 9 and 3 o’clock positions.) It can take some strength to squeeze all of the slime into the tube, but it’s not that difficult.

While the instructions depict, and most people would, installing the slime while the tube is mounted inside the tire, I ignored this and installed the slime with the tube outside the tire.
After you empty half a bottle into a tube, you’ll remove the fill tube and reinstall the valve core. Then you’ll repeat for the other tire.
Then you proceed to mount the tube in the tire, mount the tire back on the rim and inflate to the recommend pressure as usual.
The (BIG) Problem
This is my first time installing slime into a tube – in the past I haven’t used slime. I followed all of the instructions (except I didn’t have the tube mounted in the tire when filling it with slime) for both tubes.
The first tube, installed in my front tire, mounted perfectly fine. The tube inflated just fine, with no problems with the valve stem or anything. See “The Next Day…” heading for an update on how this installation fared.
However, the rear tube gave me problems.
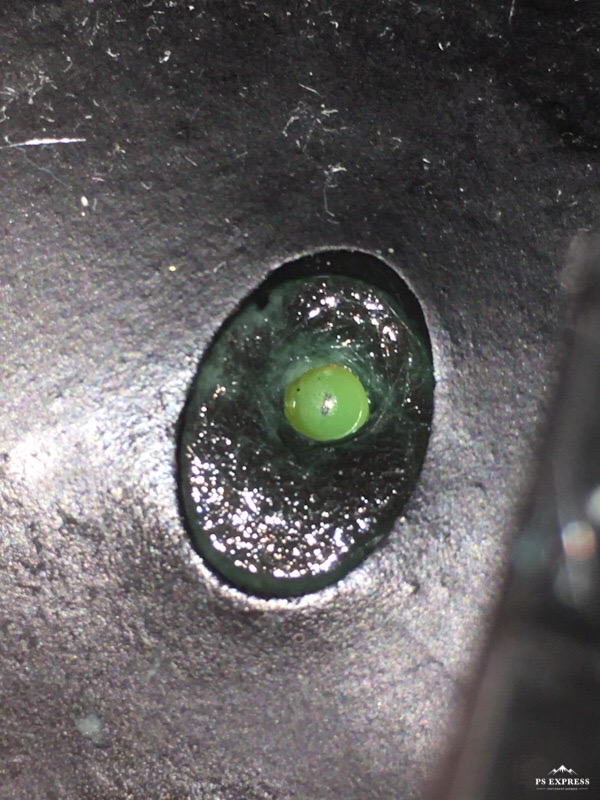
I repeated the same process for the rear tube and didn’t have any problems. Until I pressurized the tire to 20 PSI. I typically deflate the tire after reaching 20 PSI to allow the tube to settle in before then inflating to the recommend pressure (65 PSI for the rear.) But when I removed my pump and used my tire iron to let air out of the tube, this happened:

The expected “hiss” did not occur. Instead of air coming out of the valve (as should happen,) Slime started to slowly gush out of the valve. I couldn’t get any air to come out!
After some playing around with the valve core, I was able to get some air to leak out. After the tire was mostly deflated, I used my valve core removal tool to remove the valve core.
One very common issue with Slime tubes (and the other self-sealing tubes – as this complaint was common with the Protek Max, although I never experienced it myself) was a build-up in the valve stem. The slime will collect in the valve stem, dry up and “seal” the valve stem as if it was a puncture. Thus, no air is able to get in or out of the tube. (Another common mistake is a stuck valve core.) In other words, the slime works a little too good.
That’s exactly what happened with this tube. You can see a lot of dried slime built up on the bottom of the valve core.

I found another spare valve core and installed it. This time, it shouldn’t gunk up again – should it?!?

WRONG!
The same thing happened on the second valve core. Pressurized to 20 PSI, tried to deflate but nothing. It took a lot more to get some air out – I thought I might have to actually purposely puncture the tube to get it to deflate. Thankfully, after a while it started to go down – also with slime gurgling out the valve.
I wanted to try one last time with a third valve core. This time, I added a bit of water in the tube to dilute the slime and hopefully allow it to not affect the operation of the valve.
Unfortunately, that idea didn’t work. I thought it may prevent the slime from solidifying and sticking the valve – but the same exact thing happened.
This time, I had no other choice. I had to puncture the tube to get it to go down as the valve was stuck.
Once I got the tube off the rim, I sacrificed the tube for science. I cut it open and drained off the slime and water to have an inside look at what may be going on.

After a while, I was able to unscrew the valve core and take a look at that. It didn’t really look much different from the previous valves.
One of the things I noticed was that the actuator on the valve core wouldn’t be nearly as long or springy as it was on a normal valve. I compared it to another valve core from a normal, “virgin” tube and yep – something’s definitely up.
My guess is the slime is gumming up the valve core, causing the actuator to become stuck. Unfortunately, no amount of cleaning would release the actuator – rendering the core useless.
From inside the tube, I noticed there was also a buildup of gunk inside the valve stem itself, which could definitely explain the inability to inflate or deflate the tube.
The Next Day…
While I had to sacrifice the rear tube to science (and puncture it just to get it to deflate,) the front tube was holding air perfectly fine.
The next day I removed the tube from the front tire and placed it in the rear. Typically, I like to put the tougher/self-sealing tubes on the rear (if I have to choose) because the rear wheel can be a pain to remove and (especially) reinstall.
The good news with the front tube is that it hadn’t gummed up. Depressing the valve with the tire iron quickly deflated it, and I was able to remove the tube and place it on the rear wheel.
I inflated to 20 PSI, and… the same thing happened. Although this time it wasn’t as bad, so I was able to slowly deflate the tire from 20 PSI (which took longer than deflating the front tire all the way from 60 PSI.) After that I removed the valve core and it gummed up.
I thoroughly cleaned one of the valve cores from yesterday and installed it just to see what would happen. I didn’t hold out any hope since after cleaning the actuator was still damaged. To my amazement, it allowed me to inflate the tube! After removing the pump head it would leak, but inflating the tube some more I was able to get it to stop leaking and hold the air in.
I installed the tube and inflated to 60 PSI – and it held! The valve held. Let’s hope it holds air fine and will let me inflate/deflate the tire as usual.
Is it worth it?
Short and sweet – absolutely not.
Many car mechanics and tire shops refuse to work on (car) tires filled with slime and other sealants as it makes a mess. Bicycle shops are following suit. A lot of cyclists and bike mechanics refuse to use slime or any self-sealing tube or tube sealant due to all of the baggage it brings.
First, there’s the reliability issue. As I experienced, the slime can jam the valve core or clog the valve stem itself. You’ll be unable to inflate or deflate the tube, which isn’t a good thing when your tire needs air. It would especially be troublesome for those cyclists who like to regularly adjust their pressures (“air down” and “air up”) for different terrain and riding conditions.
Second, it’s messy. As mentioned, the sealant will stain clothing, carpet and almost anything else it comes into contact with. If you’re not careful, tubes containing sealant can spray the sealant. As I experienced, the sealant can also leak out the valve and make a mess. This isn’t even mentioning the mess you have if you have a blowout, a puncture or the tube is torn.
Third, it’s expensive. I paid $9.96 for two Goodyear heavy duty tubes from my local Walmart. The Slime (brand) self-sealing, pre-filled tubes at my local Walmart would set you back $6.96 per tube. A bottle of the Slime sealant will set you back $6.96. More expensive self-sealing tubes, like the $13 Protek Max, do exist.
Fourth, it adds unnecessary weight. Between handling the empty “virgin” Goodyear heavy duty tube and the same tube with the slime installed, there is a very clear weight difference. For those who watch every milligram of weight on their bike (roadies and BMX’ers,) you definitely don’t want the slime. For the average rider, I’m not sure how it would affect handling. From the Protek Max, I could feel a slight difference- but it didn’t really affect the handling of the bike.
In my opinion, the slime just isn’t worth it. There are other ways to flat-proof your tires (see below) that are more effective and reliable. The bottle said it will only seal punctures that occur on the tread-side of the tube (not the sidewalls or rim side,) so it wouldn’t even help if you have lots of thorns or goatheads that like to puncture through the sidewall.
Stay away from self-sealing tubes – instead, try these:
Alternatives to flat-proof your tire
- Puncture guards, such as “Mr. Tuffy”
- Tires with Kevlar and puncture-resistant structures
- Thicker tubes
Another alternative that is a little more involved, more risky and is the most expensive option: going tubeless. While it sounds like a horrible option, many out there swear by tubeless setups and claim that they’re more puncture resistant. But going tubeless requires changing tires, buying materials and possibly even buying new rims. Tubeless setups are best for mountain bikes and are not common on road bikes or BMX bikes.
Here’s a good video depicting the puncture resistance of tubeless tires.
Tubeless tires are growing in popularity, but they’re at a point where they’re still only for a niche group of cyclists: mountain bikers. As mentioned, many have cautioned against running tubeless on road bikes due to the high pressures – and BMX is too harsh and would likely result in a lot of burping and issues with tubeless tires. But I’m not an expert on tubeless.
I ran the “Mr. Tuffy” liners on the Pinnacle around the time I purchased it (before it was decommissioned the first time) and they seemed to do a pretty decent job. The “Mr. Tuffy” liners did do a good job at preventing flats from a multitude of things on the tread-side of the tire – but they can’t protect from sidewall punctures or punctures caused by issues at the rim, such as damaged rim strips or burs in the rim.
There’s no way to completely get rid of flat tires unless you go with airless or solid tires. But you can prevent them, and always plan for the worst case scenario by carrying patches, tubes and a tool kit.
One thought on “My Slime Experience”
Comments are closed.